多终端同步Hexo

放寒假了,玩游戏!

img

呸呸呸

我是那种人么???

放假了要好好学习,而且学什么要记录一下,每天写点博客记录一下自己的点点滴滴啊~!可垃圾笔记本屏幕太小了,看的眼疼,没有办法在原先本本上写MD博客

肿么办?

不慌,可以利用Git在多平台上同步Hexo!

下面我就分享一下步骤~

准备

环境我就不说了,Node.js,Git,Hexo,这些都是最基本的

下载Git

下载 git OSX 版:git-scm.com/download/ma…
下载 git Windows 版:git-scm.com/download/wi…
下载 git Linux 版:git-scm.com/download/li…

安装Git

Linux
$ sudo yum install git
或者
$ sudo apt-get install git
Mac
直接在 Terminal 执行 git 命令, 如果没有会提示安装方法.

笔记本端(需要备份的一端)

进入我博客的原始文件夹内,找到.gitignore(Git就会自动忽略文件总汇)文件,用记事本打开~

添加如下

1
2
3
public/
.deploy*/
node_modules/ #npm install产生的node_modules由于路径过长不好处理

添加完成后,右键 Git Bash,输入以下代码:

1
2
3
4
5
6
7
git init  #初始化本地仓库
git add . #将必要的文件依次添加
git commit -m "更新说明" #引号里面随便改哦~
git branch hexo #新建hexo分支,当然,分支名字“hexo”也可以随便改哦~
git checkout hexo #切换到hexo分支上
git remote add origin git@github.com:tengshe789/tengshe789.github.io.git #将本地与Github项目对接,tengshe789为我的用户名
git push origin hexo #push到Github项目的hexo分支上

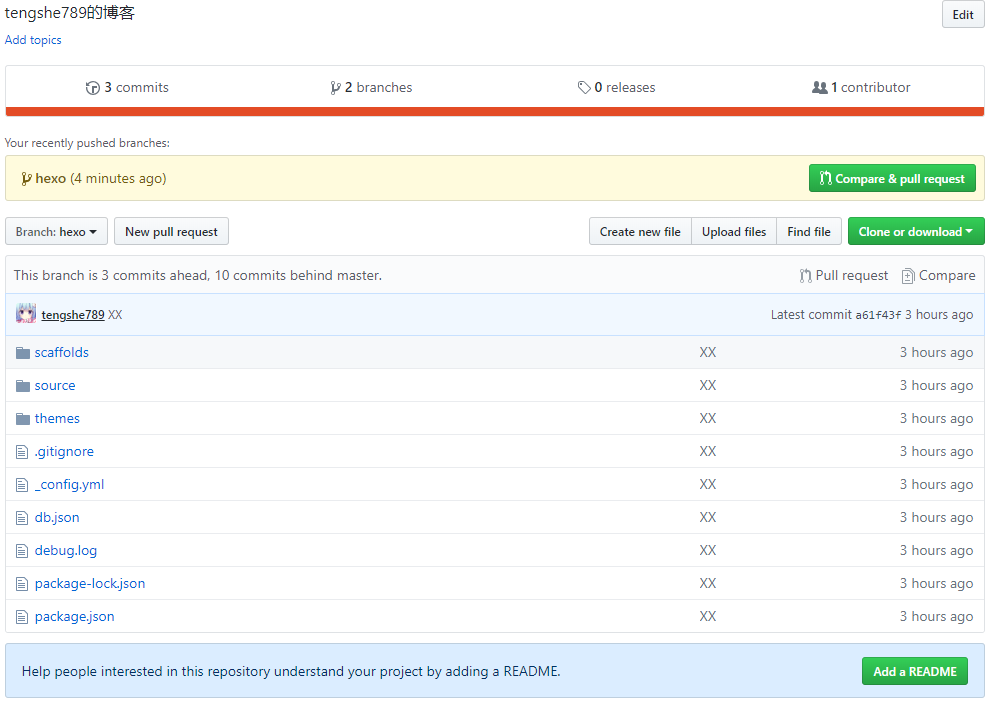
完成后合影~

这里有很多隐私文件夹,譬如config.yml,db.json…..我也一一上传了,因为我是个不怕暴漏隐私的人哈哈哈哈。要想避免这个情况只将source添加即可

台式机端(需要还原的一端)

1
2
3
4
5
6
7
8
git clone -b hexo git@github.com:tengshe789/tengshe789.github.io.git  #将Github中hexo分支clone到本地
cd tengshe789.github.io #切换到刚刚clone的文件夹内
npm install #注意,这里一定要切换到刚刚clone的文件夹内执行,安装必要的所需组件,不用再init
npm install hexo-cli -g # 如果不同机器node版本升级了,需要重新运行这个
npm install https://github.com/CodeFalling/hexo-asset-image --save #图片插件
npm install --save hexo-pdf #pdf插件
npm install hexo-deployer-git #部署
npm install hexo-generator-restful --save #生成 restful 风格的 json 数据 https://github.com/yscoder/hexo-generator-restful

完成!

接下来写一篇博客庆祝一下~

1
hexo new post "new blog name"   #新建一个.md文件,并编辑完成自己的博客内容

写完,备份一下,再同步到github!

1
2
3
4
git add source  #每次只要更新sorcerer中的文件到Github中即可,因为只是新建了一篇新博客
git commit -m "更新说明"
git push origin hexo #更新分支
hexo d -g #push更新完分支之后将自己写的博客对接到自己搭的博客网站上,同时同步了Github中的master

番外:笔记本怎么同步?

进入我博客的原始文件夹内

1
git pull origin hexo  #先pull完成本地与远端的融合

Hexo异常:fatal:inunpopulatedsubmodule’.deploy_git’怎么解决

实在不行,就把它删掉,然后重新生成和部署。

1
`rm -rf .deploy_git``hexo g``hexo d`

Git命令整理

Git配置

git config –global user.name “robbin”
git config –global user.email “randyvan007@hotmail.com“
git config –global color.ui true
git config –global alias.co checkout
git config –global alias.ci commit
git config –global alias.st status
git config –global alias.br branch
git config –global core.editor “mate -w” # 设置Editor使用textmate
git config -l # 列举所有配置
用户的git配置文件~/.gitconfig

Git常用命令

查看、添加、提交、删除、找回,重置修改文件

1
2
3
4
5
6
7
8
9
10
11
12
13
14
15
16
17
18
19
20
21
22
23
24
25
git help  <command>  # 显示command的help
git show # 显示某次提交的内容
git show $id

git co -- <file> # 抛弃工作区修改
git co . # 抛弃工作区修改

git add <file> # 将工作文件修改提交到本地暂存区
git add . # 将所有修改过的工作文件提交暂存区

git rm <file> # 从版本库中删除文件
git rm <file> --cached # 从版本库中删除文件,但不删除文件

git reset <file> # 从暂存区恢复到工作文件
git reset -- . # 从暂存区恢复到工作文件
git reset --hard # 恢复最近一次提交过的状态,即放弃上次提交后的所有本次修改

git ci <file>
git ci .
git ci -a # 将git add, git rm和git ci等操作都合并在一起做
git ci -am "some comments"
git ci --amend # 修改最后一次提交记录

git revert <$id> # 恢复某次提交的状态,恢复动作本身也创建了一次提交对象
git revert HEAD # 恢复最后一次提交的状态

查看文件diff

1
2
3
4
5
6
7
git diff <file>     # 比较当前文件和暂存区文件差异
git diff
git diff <$id1> <$id2> # 比较两次提交之间的差异
git diff <branch1>..<branch2> # 在两个分支之间比较
git diff --staged # 比较暂存区和版本库差异
git diff --cached # 比较暂存区和版本库差异
git diff --stat # 仅仅比较统计信息

查看提交记录

1
2
3
4
5
6
7
git log
git log <file> # 查看该文件每次提交记录
git log -p <file> # 查看每次详细修改内容的diff
git log -p -2 # 查看最近两次详细修改内容的diff
git log --stat # 查看提交统计信息
tig
Mac上可以使用tig代替diff和log,brew install tig

Git 本地分支管理

查看、切换、创建和删除分支

1
2
3
4
5
6
7
8
9
10
11
12
13
14
15
git br -r           # 查看远程分支
git br <new_branch> # 创建新的分支
git br -v # 查看各个分支最后提交信息
git br --merged # 查看已经被合并到当前分支的分支
git br --no-merged # 查看尚未被合并到当前分支的分支

git co <branch> # 切换到某个分支
git co -b <new_branch> # 创建新的分支,并且切换过去
git co -b <new_branch> <branch> # 基于branch创建新的new_branch

git co $id # 把某次历史提交记录checkout出来,但无分支信息,切换到其他分支会自动删除
git co $id -b <new_branch> # 把某次历史提交记录checkout出来,创建成一个分支

git br -d <branch> # 删除某个分支
git br -D <branch> # 强制删除某个分支 (未被合并的分支被删除的时候需要强制)

分支合并和rebase

1
2
3
4
5
git merge <branch>               # 将branch分支合并到当前分支
git merge origin/master --no-ff # 不要Fast-Foward合并,这样可以生成merge提交

git rebase master <branch> # 将master rebase到branch,相当于:
git co <branch> && git rebase master && git co master && git merge <branch>

Git补丁管理(方便在多台机器上开发同步时用)

1
2
3
git diff > ../sync.patch         # 生成补丁
git apply ../sync.patch # 打补丁
git apply --check ../sync.patch # 测试补丁能否成功

Git暂存管理

1
2
3
4
git stash                        # 暂存
git stash list # 列所有stash
git stash apply # 恢复暂存的内容
git stash drop # 删除暂存区

Git远程分支管理

1
2
3
4
5
6
7
8
9
10
11
12
13
git pull                         # 抓取远程仓库所有分支更新并合并到本地
git pull --no-ff # 抓取远程仓库所有分支更新并合并到本地,不要快进合并
git fetch origin # 抓取远程仓库更新
git merge origin/master # 将远程主分支合并到本地当前分支
git co --track origin/branch # 跟踪某个远程分支创建相应的本地分支
git co -b <local_branch> origin/<remote_branch> # 基于远程分支创建本地分支,功能同上

git push # push所有分支
git push origin master # 将本地主分支推到远程主分支
git push -u origin master # 将本地主分支推到远程(如无远程主分支则创建,用于初始化远程仓库)
git push origin <local_branch> # 创建远程分支, origin是远程仓库名
git push origin <local_branch>:<remote_branch> # 创建远程分支
git push origin :<remote_branch> #先删除本地分支(git br -d <branch>),然后再push删除远程分支

Git远程仓库管理

1
2
3
4
5
git remote -v                    # 查看远程服务器地址和仓库名称
git remote show origin # 查看远程服务器仓库状态
git remote add origin git@github:robbin/robbin_site.git # 添加远程仓库地址
git remote set-url origin git@github.com:robbin/robbin_site.git # 设置远程仓库地址(用于修改远程仓库地址)
git remote rm <repository> # 删除远程仓库

创建远程仓库

1
2
3
4
5
6
7
8
9
10
11
12
13
git clone --bare robbin_site robbin_site.git  # 用带版本的项目创建纯版本仓库
scp -r my_project.git git@git.csdn.net:~ # 将纯仓库上传到服务器上

mkdir robbin_site.git && cd robbin_site.git && git --bare init # 在服务器创建纯仓库
git remote add origin git@github.com:robbin/robbin_site.git # 设置远程仓库地址
git push -u origin master # 客户端首次提交
git push -u origin develop # 首次将本地develop分支提交到远程develop分支,并且track

git remote set-head origin master # 设置远程仓库的HEAD指向master分支
也可以命令设置跟踪远程库和本地库

git branch --set-upstream master origin/master
git branch --set-upstream develop origin/develop

HappyEnding

完成,继续玩游戏!

参考链接1

参考链接2

感谢!

想要解锁更多新姿势?请访问我的博客

-------------本稿が終わる感谢您的阅读-------------