关于Hashmap的个人理解

刚刚看到QQ群有人吹Hashmap,一想我啥都不懂,就赶快补了一波。下面分享一下我对Hashmap的理解,主要用于个人备忘。如果有不对,请批评。想要解锁更多新姿势?请访问https://tengshe789.github.io/

总起

Hashmap是散列表,存储结构是键值对形式。根据健的Hashcode值存储数据,有较快的访问速度。

它的线程是不安全的,在两个线程同时尝试扩容HashMap时,可能将一个链表形成环形的链表,所有的next都不为空,进入死循环;要想让它安全,可以用 Collections的synchronizedMap 方法使 HashMap具有线程安全的能力,或者使用ConcurrentHashMap

他的键值对都可以为空,映射不是有序的。

Hashmap有两个参数影响性能:初始容量,加载因子。
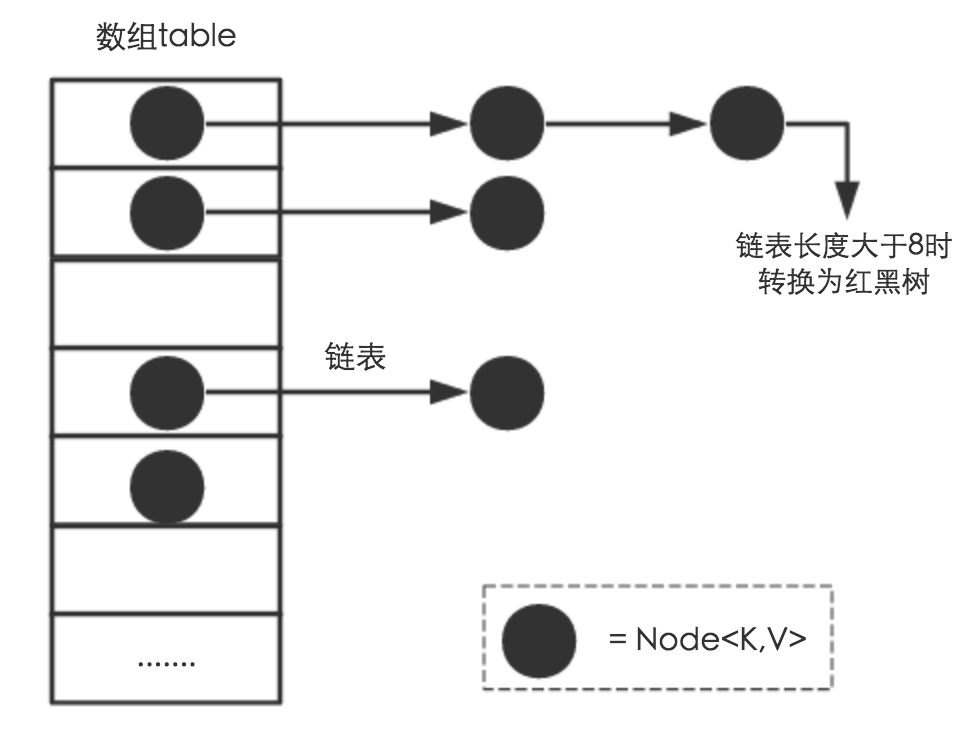
Hashmap存储结构

JDK1.8中Hashmap是由链表、红黑树、数组实现的

img

1
2
3
4
5
6
7
8
9
10
11
12
13
14
15
16
17
18
19
20
21
22
23
24
25
26
27
28
29
30
31
32
33
34
35
36
37
38
39
40
//用来实现数组、链表的数据结构
static class Node<K,V> implements Map.Entry<K,V> {
final int hash;//保存节点的Hash
final K key;//保存节点的键值
V value;//保存节点的值
Node<K,V> next;//指向链表或者红黑树的下一个节点

Node(int hash, K key, V value, Node<K,V> next) {
this.hash = hash;
this.key = key;
this.value = value;
this.next = next;
}

public final K getKey() { return key; }
public final V getValue() { return value; }
public final String toString() { return key + "=" + value; }

public final int hashCode() {
return Objects.hashCode(key) ^ Objects.hashCode(value);
}

public final V setValue(V newValue) {
V oldValue = value;
value = newValue;
return oldValue;
}

public final boolean equals(Object o) {
if (o == this)
return true;
if (o instanceof Map.Entry) {
Map.Entry<?,?> e = (Map.Entry<?,?>)o;
if (Objects.equals(key, e.getKey()) &&
Objects.equals(value, e.getValue()))
return true;
}
return false;
}
}

Hashmap构造方法

HashMap有4个构造方法。

代码:

1
2
3
4
5
6
7
8
9
10
11
12
13
14
15
16
17
18
19
20
21
22
23
24
25
26
27
28
29
//方法1.制定初始容量和负载因子
public HashMap(int initialCapacity, float loadFactor) {
if (initialCapacity < 0)
throw new IllegalArgumentException("Illegal initial capacity: " +
initialCapacity);
if (initialCapacity > MAXIMUM_CAPACITY)
initialCapacity = MAXIMUM_CAPACITY;
if (loadFactor <= 0 || Float.isNaN(loadFactor))
throw new IllegalArgumentException("Illegal load factor: " +
loadFactor);
this.loadFactor = loadFactor;
this.threshold = tableSizeFor(initialCapacity);
}

//方法2.指定初始容量
public HashMap(int initialCapacity) {
this(initialCapacity, DEFAULT_LOAD_FACTOR);
}

//方法三。无参构造。
HashMap() {
this.loadFactor = DEFAULT_LOAD_FACTOR; // all other fields defaulted
}

//方法四。将另一个 Map 中的映射拷贝一份到自己的存储结构中来,这个方法不是很常用
public HashMap(Map<? extends K, ? extends V> m) {
this.loadFactor = DEFAULT_LOAD_FACTOR;
putMapEntries(m, false);
}

Hashmap变量成员

1
2
3
4
5
6
7
8
9
10
11
12
13
14
15
16
//未指定容量的时候,数组的初始容量。初始容量是16
//为什么不直接写16?因为速度快。计算机里面要转换二进制。
//必须2的n次幂
static final int DEFAULT_INITIAL_CAPACITY = 1 << 4; // aka 16

//负载因子。当hashmap容量超过 容量*负载因子 时,进行扩容操作(resize())
static final float DEFAULT_LOAD_FACTOR = 0.75f;

//确定何时将hash冲突的链表转换成红黑树
static final int TREEIFY_THRESHOLD = 8;

//用来确何时将红黑树转换成链表
static final int UNTREEIFY_THRESHOLD = 6;

//当链表转换成红黑树时,需要判断数组容量。若数组容量太小导致hash冲突太多,则不进行红黑树操作,转而利用reseize扩容
static final int MIN_TREEIFY_CAPACITY = 64;

初始容量、负载因子、阈值.

一般情况下,使用无参构造方法创建 HashMap。但当我们对时间和空间复杂度有要求的时候,使用默认值有时可能达不到我们的要求,这个时候我们就需要手动调参。

在 HashMap 构造方法中,可供我们调整的参数有两个,一个是初始容量initialCapacity,另一个负载因子loadFactor。通过这两个设定这两个参数,可以进一步影响阈值大小。但初始阈值 threshold 仅由initialCapacity 经过移位操作计算得出。

名称 用途
initialCapacity HashMap 初始容量
loadFactor 负载因子
threshold 当前 HashMap 所能容纳键值对数量的最大值,超过这个值,则需扩容

默认情况下,HashMap 初始容量是16,负载因子为 0.75。 注释中有说明,阈值可由容量乘上负载因子计算而来 ,即threshold = capacity * loadFactor

1
2
3
4
5
6
7
8
9
static final int tableSizeFor(int cap) {
int n = cap - 1;
n |= n >>> 1;
n |= n >>> 2;
n |= n >>> 4;
n |= n >>> 8;
n |= n >>> 16;
return (n < 0) ? 1 : (n >= MAXIMUM_CAPACITY) ? MAXIMUM_CAPACITY : n + 1;
}

这段代码有点难,根据大神的说法,这个方法的意思是,找到大于或等于 cap 的最小2的幂。我们先来看看 tableSizeFor 方法的图解 :

图中容量是229+1,计算后是230

引用一下啊大神说的:

对于 HashMap 来说,负载因子是一个很重要的参数,该参数反应了 HashMap 桶数组的使用情况(假设键值对节点均匀分布在桶数组中)。通过调节负载因子,可使 HashMap 时间和空间复杂度上有不同的表现。当我们调低负载因子时,HashMap 所能容纳的键值对数量变少。扩容时,重新将键值对存储新的桶数组里,键的键之间产生的碰撞会下降,链表长度变短。此时,HashMap 的增删改查等操作的效率将会变高,这里是典型的拿空间换时间。相反,如果增加负载因子(负载因子可以大于1),HashMap 所能容纳的键值对数量变多,空间利用率高,但碰撞率也高。这意味着链表长度变长,效率也随之降低,这种情况是拿时间换空间。至于负载因子怎么调节,这个看使用场景了。一般情况下,我们用默认值就可以了。

插入PUT

过程:

  1. 对Key求hash值,然后计算下标
  2. 如果没有碰撞,就放入桶中
  3. 如果碰撞了,就以链表形式放到后面
  4. 如果链表长度超过阈值,就把链表转换成红黑树
  5. 如果链表存在则替换旧值
  6. 如果桶满了(容量*负载因子),则重新resize
1
2
3
4
public V put(K key, V value) {
//调用核心方法
return putVal(hash(key), key, value, false, true);
}

putVal

核心算法在putVal()中。要想理解,先要明白桶排序(Bucket Sort)

它是迄今为止最快的一种排序法,其时间复杂度仅为Ο(n),也就是线性复杂度。

桶排序核心思想是:根据数据规模n划分,m个相同大小的区间 (每个区间为一个桶,桶可理解为容器) 。将n个元素按照规定范围分布到各个桶中去 ,再对每个桶中的元素进行排序,排序方法可根据需要,选择快速排序,或者归并排序,或者插入排序 ,然后依次从每个桶中取出元素,按顺序放入到最初的输出序列中(相当于把所有的桶中的元素合并到一起) 。

下面是代码:

1
2
3
4
5
6
7
8
9
10
11
12
13
14
15
16
17
18
19
20
21
22
23
24
25
26
27
28
29
30
31
32
33
34
35
36
37
38
39
40
41
42
43
44
45
46
47
48
49
50
51
52
53
54
final V putVal(int hash, K key, V value, boolean onlyIfAbsent,
boolean evict) {
//n是数组长度
Node<K,V>[] tab; Node<K,V> p; int n, i;
//判断桶数组是否是空
if ((tab = table) == null || (n = tab.length) == 0)
//是就用resize()初始化
n = (tab = resize()).length;
//根据 hash 值确定节点在数组中的插入位置
//若此位置没有元素则进行插入,注意确定插入位置所用的计算方法为 (n - 1) & hash,由于 n 一定是2的幂次,这个操作相当于hash % n
if ((p = tab[i = (n - 1) & hash]) == null)
//将新节点引入桶中
tab[i] = newNode(hash, key, value, null);
else {
//临时变量e进行记录。如果有值,说明仅仅是值的覆盖。
Node<K,V> e; K k;
// 如果键的值以及节点 hash 等于链表中的第一个键值对节点时,则将 e 指向该键值对
if (p.hash == hash &&
((k = p.key) == key || (key != null && key.equals(k))))
e = p;
else if (p instanceof TreeNode)// 如果桶中的引用类型为 TreeNode,则调用红黑树的插入方法
e = ((TreeNode<K,V>)p).putTreeVal(this, tab, hash, key, value);
else {// 对链表进行遍历,并统计链表长度
for (int binCount = 0; ; ++binCount) {
if ((e = p.next) == null) {
p.next = newNode(hash, key, value, null);
// 链表中不包含要插入的键值对节点时,则将该节点接在链表的最后
if (binCount >= TREEIFY_THRESHOLD - 1) // -1 for 1st
treeifyBin(tab, hash);
break;
}
if (e.hash == hash &&
((k = e.key) == key || (key != null && key.equals(k))))
break;
p = e;
}
}
//临时变量e不为空时,说明已经有值进行替换了
if (e != null) { // existing mapping for key
V oldValue = e.value;
if (!onlyIfAbsent || oldValue == null)
e.value = value;
afterNodeAccess(e);
//返回老值
return oldValue;
}
}
++modCount;
//扩容
if (++size > threshold)
resize();
afterNodeInsertion(evict);
return null;
}

HASH

hash算法,高十六位与低十六进行异或运算,这样做的好处是使得到结果会尽可能不同。

1
2
3
4
static final int hash(Object key) {
int h;
return (key == null) ? 0 : (h = key.hashCode()) ^ (h >>> 16);
}

resize

HashMap 的扩容机制与其他变长集合的套路不太一样,HashMap 按当前桶数组长度的2倍进行扩容,阈值也变为原来的2倍(如果计算过程中,阈值溢出归零,则按阈值公式重新计算)。扩容之后,要重新计算键值对的位置,并把它们移动到合适的位置上去。

resize总共做了3件事,分别是:

  1. 计算新桶数组的容量 newCap 和新阈值 newThr
  2. 根据计算出的 newCap 创建新的桶数组,桶数组 table 也是在这里进行初始化的
  3. 将键值对节点重新映射到新的桶数组里。如果节点是 TreeNode 类型,则需要拆分红黑树。如果是普通节点,则节点按原顺序进行分组。
1
2
3
4
5
6
7
8
9
10
11
12
13
14
15
16
17
18
19
20
21
22
23
24
25
26
27
28
29
30
31
32
33
34
35
36
37
38
39
40
41
42
43
44
45
46
47
48
49
50
51
52
53
54
55
56
57
58
59
60
61
62
63
64
65
66
67
68
69
70
71
72
73
74
75
76
77
78
79
80
81
82
83
84
85
86
87
88
89
90
91
92
93
94
//resize()函数在size > threshold时被调用
final Node<K,V>[] resize() {
Node<K,V>[] oldTab = table;
int oldCap = (oldTab == null) ? 0 : oldTab.length;
int oldThr = threshold;
int newCap, newThr = 0;
//oldCap大于 0 代表原来的 table 非空
if (oldCap > 0) {
// 当 table 容量超过容量最大值,则不再扩容
if (oldCap >= MAXIMUM_CAPACITY) {
//阈值设为整形最大值
threshold = Integer.MAX_VALUE;
return oldTab;
}// 按旧容量和阈值的2倍计算新容量和阈值的大小
else if ((newCap = oldCap << 1) < MAXIMUM_CAPACITY &&
oldCap >= DEFAULT_INITIAL_CAPACITY)
newThr = oldThr << 1; // double threshold
}
else if (oldThr > 0) // initial capacity was placed in threshold
/*
*oldCap 小于等于 0 且 oldThr 大于0,代表用户创建了一个 HashMap,但是使用的构造函数为
* HashMap(int initialCapacity, float loadFactor) 或 HashMap(int initialCapacity)
* 或 HashMap(Map<? extends K, ? extends V> m),导致 oldTab 为 null,oldCap 为0,
* oldThr 为用户指定的 HashMap的初始容量
*/
newCap = oldThr;
else { //设置新容量和新阈值大小
newCap = DEFAULT_INITIAL_CAPACITY;
newThr = (int)(DEFAULT_LOAD_FACTOR * DEFAULT_INITIAL_CAPACITY);
}
// newThr 为 0 时,按阈值计算公式进行计算
if (newThr == 0) {
//计算新阈值
float ft = (float)newCap * loadFactor;
newThr = (newCap < MAXIMUM_CAPACITY && ft < (float)MAXIMUM_CAPACITY ?
(int)ft : Integer.MAX_VALUE);
}
//准备初始化过程
threshold = newThr;
@SuppressWarnings({"rawtypes","unchecked"})
Node<K,V>[] newTab = (Node<K,V>[])new Node[newCap];
table = newTab;
if (oldTab != null) {
//遍历。把 oldTab 中的节点 reHash 到 newTab 中去
for (int j = 0; j < oldCap; ++j) {
Node<K,V> e;
//判断老数组是否为空
if ((e = oldTab[j]) != null) {
//不为空,设成空
oldTab[j] = null;
//若节点是单个节点,直接重新分配定位
if (e.next == null)
newTab[e.hash & (newCap - 1)] = e;
//若节点是 TreeNode 节点,要进行 红黑树的 rehash 操作
else if (e instanceof TreeNode)
((TreeNode<K,V>)e).split(this, newTab, j, oldCap);
//若是链表,进行链表的 rehash 操作
else { // preserve order
Node<K,V> loHead = null, loTail = null;
Node<K,V> hiHead = null, hiTail = null;
Node<K,V> next;
// 遍历链表,并将链表节点按原顺序进行分组
do {
next = e.next;
if ((e.hash & oldCap) == 0) {
if (loTail == null)
loHead = e;
else
loTail.next = e;
loTail = e;
}
else {
if (hiTail == null)
hiHead = e;
else
hiTail.next = e;
hiTail = e;
}
} while ((e = next) != null);
if (loTail != null) {
loTail.next = null;
newTab[j] = loHead;
}
if (hiTail != null) {
hiTail.next = null;
// rehash 后节点新的位置一定为原来基础上加上 oldCap
newTab[j + oldCap] = hiHead;
}
}
}
}
}
return newTab;
}

关于HashMap在什么时候时间复杂度是O(1),什么时候是O(n),什么时候又是O(logn)的问题

O(1):链表的长度尽可能短,理想状态下链表长度都为1

O(n):当 Hash 冲突严重时,如果没有红黑树,那么在桶上形成的链表会变的越来越长,这样在查询时的效率就会越来越低;时间复杂度为O(N)。

O(logn):采用红黑树之后可以保证查询效率O(logn)

手写

1
2
3
4
5
6
7
8
9
10
11
12
13
14
15
16
17
18
19
20
21
22
23
24
25
26
27
28
29
30
31
32
33
34
35
36
37
38
39
40
41
42
43
44
45
46
47
48
49
50
51
52
53
54
55
56
57
58
59
60
61
62
63
64
65
66
67
68
69
70
71
72
73
74
75
76
77
78
79
80
81
82
83
84
85
86
87
88
89
90
91
92
93
94
95
96
97
98
99
100
101
102
103
104
105
106
107
108
109
110
111
112
113
114
115
116
117
118
119
120
121
122
123
124
125
126
127
128
129
130
131
132
133
134
135
136
137
138
139
140
141
142
143
144
145
146
147
148
149
150
151
152
153
154
155
156
157
158
159
160
161
162
163
164
165
166
167
168
169
170
171
172
173
174
175
176
177
178
179
180
181
182
183
184
185
186
/**
* @author tengshe789
*/
public class 手写HashMap {
public static class Node<K,V>{
K key;
V value;
Node<K,V> next;
public Node(K key, V value, Node<K, V> next) {
this.key = key;
this.value = value;
this.next = next;
}

public K getKey() {
return this.key;
}

public V getValue() {
return this.value;
}

public V setValue(V value) {
this.value=value;
return this.value;
}
}

public static class HashMap<K, V>{
/*数据存储的结构==>数组+链表*/
Node<K,V>[] array=null;

/* 哈希桶的长度 */
private static int defaultLength=16;

/*加载因子/扩容因子*/
private static double factor=0.75D;

/*集合中的元素个数*/
private int size;

/*打印函数*/
public void print() {
System.out.println("===============================");
if(array!=null) {
Node<K, V> node=null;
for (int i = 0; i < array.length; i++) {
node=array[i];
System.out.print("下标["+i+"]");
//遍历链表
while(node!=null) {
System.out.print("["+node.getKey()+":"+node.getValue()+"]");
if(node.next!=null) {
node=node.next;
}else {
//到尾部元素
node=null;
}
}
System.out.println();
}

}
}

//put元素方法
public V put(K k, V v) {

//1.懒加载机制,使用的时候进行分配
if(array==null) {
array=new Node[defaultLength];
}

//2.通过hash算法,计算出具体插入的位置
int index=position(k,defaultLength);


//扩容。判断是否需要扩容
//扩容的准则,元素的个数 大于 桶的尺寸*加载因子
if(size > defaultLength*factor) {
resize();
}

//3.放入要插入的元素
Node<K, V> node=array[index];
if(node==null) {
array[index]=new Node<K,V>(k,v,null);
size++;
}else {
if(k.equals(node.getKey()) || k==node.getKey()) {
return node.setValue(v);
}else {
array[index]=new Node<K,V>(k,v,node);
size++;
}
}

return null;
}

//扩容,并且重新排列元素
private void resize() {
//翻倍扩容
//1.创建新的array临时变量,相当于defaultlength*2
Node<K, V>[] temp=new Node[defaultLength << 1];

//2.重新计算散列值,插入到新的array中去。 code=key % defaultLength ==> code=key % defaultLength*2
Node<K, V> node=null;
for (int i = 0; i < array.length; i++) {
node=array[i];
while(node!=null) {
//重新散列
int index=position(node.getKey(),temp.length);
//插入头部
Node<K, V> next = node.next;
//3
node.next=temp[index];
//1
temp[index]=node;
//2
node=next;

}
}

//3.替换掉老array
array=temp;
defaultLength=temp.length;
temp=null;


}

private int position(K k,int length) {
int code=k.hashCode();

//取模算法
return code % (length-1);

//求与算法
//return code & (defaultLength-1);
}

public V get(K k) {
if(array!=null) {
int index=position(k,defaultLength);
Node<K, V> node=array[index];
//遍历链表
while(node!=null) {
//如果key值相同返回value
if(node.getKey()==k) {
return node.getValue();
} else
//如果key值不同则调到下一个元素
{
node=node.next;
}
}
}


return null;
}


}

public static void main(String[] args) {
HashMap<String, String> map=new HashMap<String, String>();
map.put("001号", "001");
map.put("002号", "002");
map.put("003号", "003");
map.put("004号", "004");
map.put("005号", "005");
map.put("006号", "006");
map.put("007号", "007");
map.put("008号", "008");
map.put("009号", "009");
map.put("010号", "010");
map.put("011号", "011");
map.print();

System.out.println("========>"+map.get("009号"));
}

}

参考资料

coolblog

阿里架构师带你分析HashMap源码实现原理

感谢!


以下来自n天后的我:

补充一下看到一个非常好的:点击链接,值得学习

-------------本稿が終わる感谢您的阅读-------------